

 With blue hues paint the sky, adding water and no pigment as you go down the page. Start to indicate foliage as you sculpt out the barn shape. This painting will be a predominately warm painting with a touch of cool. Continue on down the page with local from you reference sheet. Let dry.
 Start your second wash with mid-tone values. Start to make tree shapes in the background with darker values. Using the edge of a credit card, scrape out some tree trunk shapes and grasses in the foreground. Repeat with the same colors - just darker values - in the foreground. Indicate windows and doors in the barn with darker values. Refer to your value study to see the dark shapes. Let dry.
 Your final wash will consist of darker values. The roof, doorway and foreground are going to be your darkest values. Make sure your vertical lines of the building are parallel with the edge of your painting. Indicate some foliage in front of the doorway on the barn, by wetting the pigment and dragging the edge of the credit card through the area. Add some dark limbs and tree trunks.


 >Using the value study as a guide, leave your white shapes your lightest values. Carve out around these shapes with the different local hues from the photograph. This is done in one continuous wash. Let dry.
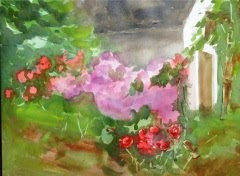 Drop in the local hue on the flowers. Start to build up your shapes with middle values hues, leaving your first wash to show through in some areas. Use a piece of a credit card to scratch out some grasses. While the pigment is still wet on the roses, use a credit card to show some line work and shape on the roses.
 Now start to show your dark shapes from your value study. To build up the flowers, add another darker value to show a shadow side. Divide up the shape into smaller shapes with value and dark shapes. When the roof is dry, show line work which will give the roof some texture. Also show some line work in the flower stems and grasses.

